
Driving - Track Skills
Everything about Track Day driving and the skills required.
How to drive
your MX-5 FAST.
Sit upright and grip the wheel lightly
while keeping the elbows bent. If you lean back and have straight arms you
will have a lot less control of the car if you need to make any
corrections. Always look & think ahead. To get good track times, the
skill is keeping the cars momentum as high as possible, not hard
braking then hard acceleration at every corner. Use ALL the engine revs. Drive through a corner, not up to and then out of a corner.
Corners & How to drive them....
 |
<
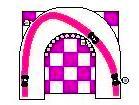
90° Fast corner High speed approach, aim for the middle point of the turn, then accelerate out, aiming for the opposite side of the track. Should be taken with little or no loss of speed. The corner should feel nice and smooth |
 |
Hairpin
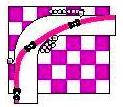
bend Turn in late to make the exit of the hairpin a fast corner, which then gives you more space to accelerate. If you turn in early then you will have a slow exit. |
 |
90 Degree
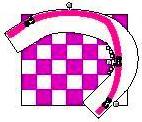
Bend There are lots of ways to negotiate this type of bend. The 'Classic' way is similar to the hairpin, in that you turn in late then straighten the remaining part of the bend as much as possible. |
 |
Tightening
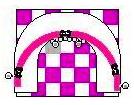
Turn/Bend Approach the turn very wide, brake and select a lower gear. Aim for a late apex accelerating out of the turn. |
 |
Constant
Radius Corner With this type of corner, turn in early keeping close to the inside of the tack. The exit should be a mirror image of the entry for a fast exit. |
 |
The
Opening Corner Turn in early and aim for a early apex. By keeping the car wide the exit can then be driven like a fast corner, |
 |
The Double
Apex Ideal solution for this type of bend is to make the 2 corners into 1 long one, so that the exit of the first becomes the entrance to the second. |
 |
S-Bends
& Chicanes Set up the approach so that route through the bends is as straight as possible, excessive movement in the steering will result in more loss of speed. |
 |
Tight
Corner After a Fast one Take a tight line in to the first corner, braking at first apex so to set the car up for the second, accelerate out of the turn as the car passes the 2nd apex. |
 |
2 Corners
onto a Straight The approach to the 1st of the corners is the key to a fast exit. Turn in late for a late apex, then take the 2nd bend with the car accelerating onto the straight. The corners should be driven with a relaxed feeling of 1 . . 2 . |
The above techniques can also be
adapted for use on the public highway.
Under-steering and Over-steering.
Over-steer
is when
the rear wheels are moving in a larger arc than the front wheels or the
intended line of the turn. Rear "slip angles" exceed those of
the front tyres. This is often described as a "loose" condition,
as the car feels like it may swap ends, or be "twitchy." This
condition can be caused by "power over-steer", you need to either
reduce power in order to bring the back end back into line or keep the
power down and steer into the rear wheel slide, which will stop the car
from spinning. You need to judge the exit of corner to make sure there is
enough space for you to exit safely as the car will exit wider than the
original line. If done correctly this 'Power Slide' should feel like the
car is 'floating' through the corner. As you approach the exit of the
corner, slowly straighten up the front wheels so they are facing the line
you wish to take. As soon as the car stops sliding, immediately adjust the steering wheel to the
direction you are heading, otherwise the car will very quickly grip and spin the other way. If correction is too late you can easily have a series of slides, as though you are driving in a slalom event, often each being larger than the one before and ultimately leading to a spin.
When control is properly regained, resume cornering and gently put the power back on.
Under-steer
is when
the front wheels are moving a larger arc than the rear wheels. This is
often described as "push" or "pushing" - as the front
end feels like it is plowing off of a corner. Further acceleration only
compounds the push, as weight shifts back to the rear drive wheels off of
the front turning wheels, leading to a further lessening of the car's
ability to turn in. When driving, the front of the car feels like it is
sliding away from you as if you were trying to complete a tight turn on
ice. Under-steer can be corrected by easing off the throttle to
transfer weight forward to the front wheels, aiding their traction and
ability to carve the turn. Do not back right off the
accelerator otherwise you could induce a spin. Once past the apex and pointing at the exit point, power can
re-applied.
How to 'Heel-Toe' downshift.
This is a technique which is used when braking and downshifting to match the speed of the engine to the transmission. Example, if you are downshifting from 3rd to 2nd when taking a corner, with the engine starting at, 3500 rpm and after the downshift, ends up at about, 4300. If you don't use your right foot to blip the throttle back up to 4300 before you let off the clutch, the revs will have dropped to near, 2500 rpm and the clutch/transmission would then have to "drag" the engine up to the required 4300 rpm. This can be hard on the clutch and upsets the balance of the car, frequently breaking the rear tyres loose. The heel-toe part comes in when you have to be on the brakes at the same time you want to be blipping the throttle.
The term 'heel-toe' can be misleading as most drivers use the inside and outside part of the foot. Start by sitting in your driving position, put your foot on the brake (inside edge of your foot) and then try to hit the accelerator with the outside edge of your foot. If you can't reach it, you'll need to either move the pedals closer together, or get some "racing" pedals. Once you're able to press both pedals with one foot, you blip the throttle by sort of rolling your foot over onto the gas while keeping constant pressure on the brake.
EXERCISES:
- On a straight section of road, establish a steady speed in fifth gear (perhaps 50MPH). Without breaking (use your right foot on the accelerator pedal only), downshift to forth. Try to blip the accelerator pedal as the shift passes through neutral so that the car doesn't pull backwards or forwards when the clutch is re-engaged. Don't try to accelerate once you're in forth. Just continue to maintain a constant speed. Shift back up into fifth. Again, try not to jerk the car. Repeat this sequence going back and forth from fifth to forth. If you've got everything right and smooth, the car will travel smoothly down the road as if you weren't changing gear. The only thing different should be the sound of the engine changing speeds.
- Next, try the same thing going back and forth between fifth and third. This will require a little more gas when blipping the throttle. Focus on keeping the car's forward motion rock-steady.
- Once you're happy that you are able to change gears smoothly, try different sequences of third, forth and fifth.
- Now, try double-clutching while downshifting. As the gear lever passes through neutral, momentarily let up the clutch pedal at the same time the throttle is being blipped. If it's done correctly, the shift lever should slip into place much easier than without double-clutching, especially when going from fifth to third.
- Try a similar exercise at 40MPH using second, third and forth. When you can downshift into second (this usually requires double clutching) at 40MPH and not affect the car's motion.
- The last part of this exercise is to accelerate at the end of a downshift. The idea is to be going at a steady speed, downshift by two gears, and take off. Try to integrate this into a single fluid motion. The acceleration should just appear as a big push from behind, without any jerking. Slow back down to a steady speed and repeat.
EXERCISES WITH BRAKING:
- With the engine off, try to find a seating and foot position that allows you to operate the brake and the gas pedal with your right foot at the same time using the ball and edge position as described earlier. While pushing on the brake pedal, try to learn to blip the accelerator pedal without varying the pressure on the brake. This will feel 'very strange' at first.
- In the course of your normal driving, practice blipping the gas pedal while you brake (don't try to downshift). Trying doing it during both light and heavy braking.
- Try to bring the engine up to different speeds. The idea is just to get used to blipping the throttle while braking, without worrying about accomplishing anything with the engine. The idea is to not let the operation of the gas pedal affect the braking.
- When ready, try braking and blipping the accelerator to rev-match into a downshift. Never change down before braking, as you risk over revving the engine.
- The next step requires an open stretch of straight road without traffic. Brake from speed, to a rev-matched downshift at the 'end' of the braking. Accelerate back up and repeat.
- Try it with and without double-clutching.
- Try it with both light and heavy braking. All the usual goals apply: Smooth transitions. Light touch on the gear lever. Unified fluid shift motions.
CORNER ENTRY EXERCISE:
- Suspension loading might best be practiced first without downshifting. The exercise is about getting into a corner. Just push in the clutch while braking and don't worry about the gas. Wait until the corner is completed before trying to downshift or speeding up again.
- Brake as you approach a corner. Try to be conscious of the level of braking force that you feel. When you reach the point where you start to turn the steering wheel, lift off of the brake in unison with moving the steering wheel.
- The goal is to feel the force swing sideways without varying in intensity. You shouldn't feel any gaps in the 'tug'. There also shouldn't be any pulses in the force. Keep it smooth and uniform.
- Try varying how fast you turn in. The faster you turn in, the faster you need to get off the brakes. Doing corners with slow turn-in is good for practice because it emphasizes the steering/braking coordination.
ALL EXERCISES TOGETHER:
If you've followed all of the exercises up to this point, adding the final steps should be a relatively easy process.
- Brake timing doesn't have to be an issue at first if you practice at reduced speeds with moderate deceleration. The main thing to focus on is to get the downshift timed so that it is 'completed' just before you start to turn the steering wheel. As the clutch is re-engaged, the gas should be held at the level where it will be during maximum cornering force.
- Transition the braking into steering as in the previous exercise. When it's time to straighten out, transition into the gas in a similar manner. Just swing the direction of the force around without any gaps or surges.
The step by step process for a 90° corner:
- Begin braking.
- Clutch pedal down, Gear lever into neutral.
- Clutch up, blip throttle.
- Clutch down, lever into second.
- Clutch up, lightly press the accelerator pedal just enough to load the drivetrain.
- Transition off of the brakes into the steering.
- Hold the corner (maintain the accelerator pedal position just below where the back end would start to slip out.
- Transition out of the steering into full acceleration.
- Shift up when needed.
Changing up a gear while Accelerating:
When up-shifting, use the minimum amount of pressure on the shift lever to slip it into the next gear. When the clutch pedal is pushed and the shift lever moves through neutral, it should almost 'seem' to pull itself into gear. The engine takes slightly longer to slow down because it has more inertia. The moment after the gear is engaged the clutch needs to be re-engaged. If the clutch is re-engaged and the power smoothly reapplied at just the right time, it should feel like there wasn't been a gear change.
- How to determine a good gear change:
-
- Was only light pressure required ?
- Was the gear change smooth?
- Was the gear change fast?
To get the very last little bit of acceleration out of a car, you can rush the shift by forcing the lever into the next gear and re-engage the clutch with the engine already on-power. This can reduce shift time 'slightly' and add a little extra inertia. This technique adds wear to the synchro's, the clutch and the rest of the drive. A well executed light-touch shift can be done quicker than a power-shift. The car will handle better if it's accelerating on a twisty road.
Getting into Reverse Gear:
To instantly get into reverse after braking in a hard stop, leave the transmission in the forward gear you were in. At the moment you get to zero speed, the lever can be put into reverse (because the intermediate shaft was halted when it was engaged to the last gear), and power can then be immediately applied.
Left Foot Braking:
This technique allows a car to be slowed with minimal effects on the car's balance, followed by very rapid resumption of acceleration.
The left foot works the brake pedal while the right foot remains on the gas pedal.
You need to establish an appropriate balance between both acceleration and deceleration
without excessive weight transfer. Left-foot braking can only be
used in turns/corners that require no downshifting, or to recover a
spin or massive over-steer.
Left-foot braking sequence: Approaching the turn at full power, rest your left foot lightly on the brake pedal.
Press the brake pedal with your left foot at the appropriate moment, while maintaining
pressure on the accelerator. The car slows somewhat and its balance shifts forward to help it turn. When the car has slowed
enough for the approaching turn, lift your left foot off the brake and add more
pressure to the accelerator. As the engine was already producing significant power during braking, the car
will now accelerate immediately.
EXERCISES:
- With the engine off, try moving your left foot on and off the brake pedal. This will feel 'very strange' at first, as you will find yourself keep looking at the pedals or just de-clutch. This technique has to become second nature, just as it is for your right foot moving from accelerator to brake. This requires lots of practice, so that there is no confusion or hesitation under pressure.
- In an empty car-park try driving in a straight line at slow speed and repeat the above exercise moving your left foot to the brake pedal. No real pressure is applied to brake pedal.
- The next exercise is to be able to brake normally with your left foot and slow the car from gradually increasing speeds.
- Repeat the same exercise, but this time maintain even pressure on the accelerator so that the engine revs stay constant. This technique when mastered is great to deter 'Tail-Gaters' as you will be able to just touch the brakes enough to light the rear brake lights while you still maintain a normal forward motion.
- Find a empty section of road which has a bend of which you are required to brake for, but does not require a down-shift. Other option is to set out a course though the empty car-park. Approach the turn at a fairly slow speed to start with, turn into the bend and apply the brake to slow the car while maintaining pressure on the accelerator. You should be able to feel the rear of the car start to slide to the outside of the turn. When you are pointing in the direction you want to go at the apex of the bend, let pressure off the brakes and increase the throttle. Repeat this exercise while gradually increasing the speed.
- Repeat the above exercise but
this time through a 'S' Bend.
What to do if you get into a Spin:
Turn the steering wheel into the direction of the spin and modulate the accelerator to neutral power. Beware of causing a spin in the opposite direction. As soon as the car stops sliding, immediately adjust the steering wheel to the normal direction, otherwise the car will very quickly grip and spin the other way. If you are unable to quickly regain control put the brakes on hard and lock the wheels. This will help ensure the car continues to spin in a straight and predictable line and should stop the car inadvertently gripping the road/track at the wrong moment and possibly throwing the car in front of following vehicles.
Track Day Driving Tips
1. General
1.1. Vehicle Preparation
-
Remove all loose items from the car, and from the boot.
-
Ensure tyres are in good condition and correct pressures.
-
All fluid levels are correct
-
Position seat correctly, (1 or 2 seat stops closer than you would sit when driving on the road).
-
Set mirrors so you can see either side of the car and directly behind.
-
Door windows must be fully up or fully down
1.2. Personal safety
-
Wear neck to wrist, to ankle non synthetic clothing, ideally a racing suit.
-
-
Wear a well fitting safety helmet with visor. Motor cycle helmets are fine but must be stamped with AS1968 and be in good condition. Full face helmets are recommended. Most circuits require these to be worn.
-
A proper seat harness and have it as tight as you can stand.
-
If you are using your normal seat belts, sit in your driving position and pull it as tight as you can stand so that you are held firmly. You will be able to feel the car better and will not get thrown about when cornering.
1.3. Following and Overtaking another vehicle
-
When a line of vehicles have to brake, the gaps between the cars close up. There is the risk that each of the following vehicles will brake later and could potential end up hitting the car in front or going too fast into the corner.
-
-
Always exercise caution when overtaking or being overtaken, stay relaxed and drive normally.
-
Beware of the 'RED MIST' coming down, mistakes are then easily made.
-
If someone comes up close on your tail let them by. Clearly indicate on which side you wish the other driver to pass, back off momentarily and let the other car by. At most it will only cost a few tenths of a second for the one lap. Don't try to block them or out run them. Two cars racing and defending lines are slower than two cars racing against the clock.
-
Remember you are here for fun, you race the clock, not other cars.
-
Don't forget you have to drive home....
1.4. Leaving and entering the pits
- Always exercise extreme caution in the pits area, particularly when coming off the track. It's easy to misjudge speed after racing on the circuit.
1.5. Flags
-
Chequered: Finish flag, End of the Session. Once you areclear of the finish line start gently slowing down and enter the pits next time round. Don't hit the brakes once you are over the finish line, the car behind still has to finish and you may be in the way.
-
Yellow: Slow down and be careful, there is a car on or near the track in a dangerous position ahead of you.
-
Red: Slow down immediately to a speed at which you can stop and proceed slowly to the pits. The race has been stopped because of significant dangers or there are people on the track.
-
Blue: Let the following car past. Back off (and / or move over) and let the car past you. You are impeding the following car and if you ignore this flag you may be black-flagged next time round.
-
Black: You are to immediately come into the pits. You have committed an offence or your car is deemed to be dangerous.
-
Red and Yellow: Warning that oil is on the track or racing line.
-
White: Non race car/vehicle on the track
-
Green: All Clear, normal racing conditions
2. Basic Car control
2.1. Accelerating
- On the race track there are times when it's important not to over accelerate, such as when exiting a tight corner and driving in the wet.
- Always feed the power on steadily, never plant the throttle. If you are exiting a corner and the tyres are close to their limit the power needs to be applied carefully to avoid the tail stepping out.
- In the wet it's also often best to use a higher gear for exiting corners, it will give better control and it's smoother, reducing the risk of losing traction through too much power too quickly.
- To maximize acceleration keep the car as straight as possible. Any turning of the steering wheel will scrub off speed due to the action of the tyres.
2.2. Braking
- It's best to only brake in a straight line. Apply the brakes gently at first then as the nose drops progressively apply more and more pressure until you have slowed to the speed you want.
- Never jab at the brakes, this will probably result in a lock up. (Note - typically the front left wheel will immediately lock on an MX5. If held on long enough you will create a flat spot in the tyre tread.)
-
If you do lock up, quickly release the brakes sufficiently for the wheels to start rotating and gripping again, then start the braking process over again.
-
In the wet it is much easier to lock up. This is the only exception where jabbing the brakes is the right thing to do. Use a series of fast jabbing type movements which should enable the tyres to break through the water and regain grip.
-
When cornering the car will automatically lose speed due to the drag effects of tyres and cornering forces, sometimes this is all that's needed to shed speed.
2.3. Changing gear
-
Changing Up: Do this quickly as possible while staying relaxed. If you try to rush this you run the risk of crunching the gears, missing the gear or worse, getting the wrong gear. Missing a gear is typical of being too tense and most often occurs when going from 2nd to 3rd and getting 5th by mistake. Also, going from 4th to 1st instead of 3rd can be very expensive (Over Revs engine etc.).
-
Changing Down: Always blip the throttle to raise the engine speed before lifting the clutch. If not you run the risk of locking the rear wheels, particularly in the lower gears.
-
Try to learn the heel and toe techniques.
-
Never change down before braking, you risk over revving the engine and you could potentially do some damage.
3. Cornering
3.1. Cornering
The key parts to a corner are:
-
The braking point
-
The turn in point
-
The apex
-
The exit point
The braking point is where you decide that you must get on the brakes to slow the car sufficiently to get the car around the corner. Use marks on the track or permanent markers alongside the track, such as concrete strips, curbs, etc
The turn in point is where you decide to turn the wheel in order to change direction.
The apex is the point at which you touch the inner edge of the track on your way around the corner. Depending on the corner and what follows, this may be in the middle of the corner or somewhat further round the corner.
The exit point is where you decide you need to head for when leaving the corner and before straightening up for the next section of track (assuming it's straight).
3.2. Corners Followed by a Straight
-
-
Where a long straight follows a corner it's best to use a late apex line as the exit speed is higher. The down side is that you have to slow the car more than normal in order to take a tighter line.
-
With the normal corner apex you could not get the power down until you reached the exit point.
-
Stay in a straight line along the edge of the track and let the car build speed. Any further change in direction will slow the car, so maximize acceleration while you can.
3.3. A Series of Corners
Where there are a series of corners it may not be possible to take a normal arc and exit point without impacting the subsequent corners. Where a straight follows the last corner the key to this situation is the ensure that the first corner is taken as efficiently as possible whilst ensuring that the last corner has priority and has the maximum exit speed, position, etc for whatever follows.
3.4. Double Apex Corners
Some corners tighten up as they progress need to be treated as two corners to ensure minimum time spent in the corner and getting a good exit. The second corner is slower than the first. To slow down for the second corner prior to entering the first corner will lose lap time. However, the technique is to go into turn 1 fast but below maximum speed. Ease the pressure on the brakes at the turn in for turn 1 and continue braking until the exit point / turn in point for the second corner. After turning in for turn 2 then get on throttle to balance the car and apex the second corner.
3.5. Early Apexing
Early apexing a corner is dangerous and is an easy and typical trap for the inexperienced driver. An early apex will mean that you will run out of road on exit if you don't take corrective action. Always be alert for the situation and be ready to correct it. Do not wait and hope you can make it, this can / will lead to an off, a spin or potentially worse. If you realise that you are apexing before the correct point of the corner take corrective action immediately. Forget lap times or positions, this is survival time. Make all attempts to keep the car on the track.
There are two solutions:
a) Straighten up and brake hard until the car has slowed sufficiently to enable you to turn it back in the right direction.
b)
However, if you are only marginally early or not to fast you can
back off the throttle (but not entirely, as you could induce a spin) and
then tighten up on the steering wheel.
4. Overtaking
4.1. Being Overtaken
-
Always keep an eye in your mirrors so you know where the other cars are or that a car is approaching and may be about to pass you. Do not allow yourself to intimidated (this easily leads to mistakes). Keep to the normal racing line and let the other driver worry about passing you. If they know you will stay on line they will be able to pass without causing either of you a problem. If you should decide to get out his way this may in fact cause an accident, so stick to the line.
-
If you really don't want to be in the way then give a CLEAR signal to the other driver. Indicate the side on which you prefer the other driver to take by pointing clearly that the OTHER driver should go the left or right side of you. Note that the other driver is under no obligation to pass as they may consider it unsafe at that time.
-
If you get to the main straight and a car has caught right up to you then they are obviously going faster than you. It's a also fact that two drivers, each worrying about the other will both be slower than if they were driving alone.
-
Always let the faster driver through, this stops accidents happening.
4.2. Overtaking another car
-
First be sure that you can in fact overtake and that it can be done safely.
-
Be aware that it is the responsibility of the overtaking driver to keep clear of the car being overtaken and not to endanger the other driver.
-
Ensure that you have the speed to pass – many cars pull out only to discover that they don't have the necessary additional speed.
-
Be sure that the other driver is aware of you and expecting you to overtake.
-
Do not blindly try to pass, the other driver may move over inadvertently into your path and you could both be in trouble.
-
If the other driver signals which side they would prefer you to pass you use this side but not unless you consider it to be safe and feasible.